How to Convert DVDs for Adaptive Streaming: Part 3 of 4
Welcome to Part III of our case study where we take three training DVDs and convert them to multiple H.264 files for adaptive streaming. When I left you in the last segment, the client was unhappy with the quality I had originally demonstrated, and would opt to cancel the project if we couldn't improve the quality to meet his standards. In this segment, I'll detail the techniques that I used to do just that.
 As part of this, I'll discuss the workflow used to rip the files from the DVDs and edit them in Adobe Premiere Pro. This includes why I used Adobe Premiere Pro, how I created my sequence presets, how and why I filtered, the format used to create the intermediate files, and why I decided not to de-interlace and render to final format in Adobe Premiere Pro.
As an overview, there are (at least) three factors that impact the quality of files encoded into the H.264 format. First is the H.264 codec used and the encoding tool. I had originally encoded my test files in Adobe Premiere Pro, which uses the MainConcept H.264 codec, which is the best available in any commercial encoding tool. According to trials produced for the StreamingMedia Sourcebook and my own book, the Adobe Media Encoder produces H.264 files that compare quite favorably to the best in class. Clearly the problem wasn't codec or encoding tool related.
The next factor is pre-processing. When you're working with footage that's been compressed before, like the DVD-based footage in this project, filtering out noise can really help improve quality. The original clips that I showed the client weren't filtered, which in retrospect was a mistake. Facing a fourth and long situation, I wouldn't make that mistake again.
The final factor is deinterlacing, which really involves identifying the best deinterlacing tool and technique and the optimal work flow for getting there. I chose to edit and filter in Adobe Premiere Pro for reasons discussed below, but Adobe's deinterlacing filters had failed me in my initial trials with the client. I had to find another encoding tool and the best work flow for getting to that tool.
Just for the record, I was being paid by the job for this one, not by the hour, so it made sense economically to get the work done as quickly as possible. In that regard, there are one stop ripping/H.264 encoding tools that I could have used, including Handbreak and several others. However, since I needed to filter the DVDs, a one-stop tool was out of the question. And yes, I did check to see if the original uncompressed source was available, and it wasn't.
Ripping the DVDs
As mentioned previously, the DVDs were not copy protected. Originally, I was looking for a tool to convert the Video Object (VOB) files on the DVD to .mpg files without re-encoding, since I figured that I could input MPEG-2 video into both Adobe Premiere Pro and Apple Final Cut Pro. Note that I was editing on a Mac because I knew that I might have to output an intermediate file to import into a separate editor, and my format of choice is Apple ProRes.
I recalled using Pinnacle Studio years ago to rip unencrypted VOB files into .mpg files, but none of my current tools have that capability, So, I googled "rip DVD" or something similar and came up with several tools, though none converted the VOB files to .mpg format. On a whim, I used File Manager to copy the VOB files from the DVD to my hard drive, and then tried to import them directly into Final Cut Pro. No dice. Then I tried Adobe Premiere Pro and they imported right in. I had found my editor.
Choosing a Sequence Preset
For this project, we were inputting interlaced 4:3 video, which has a resolution of 720x480 and a pixel aspect ratio of .9, and outputting a progressive file at 640x480 resolution using square pixels, or a pixel aspect ratio of 1.0. Somewhere along the way, we were going to have to deinterlace.
When working with a project where the output file has a different configuration than the input file, you have two basic options when it comes to creating sequence presets. First, you can create a sequence preset that matches your output file, in this case a 640x480 progressive preset. If you choose this option, the editor automatically deinterlaces all footage input into the sequence, producing the unhappy result shown on the left in Figure 6 with this highly detailed footage.
The second option is to use a sequence preset that matches the parameters of your input file and deinterlace during encoding, which produced the frame shown on the right. With this jaggy mess staring him in the face 35 seconds into the video, no wonder the client rejected it.

To be fair, Premiere Pro does a very good job deinterlacing most video footage, but the text used in this project required some specialized controls. So, we would have to output an interlaced intermediate file from Premiere Pro and deinterlace and encode in another tool.
This realization drove multiple decisions. First, we would use a preset that matched the imported footage from the DVD, which Premiere Pro makes this very easy to create. I just dragged a VOB onto the New button on the bottom of the Project panel and Premiere Pro created a sequence with the same parameters as the ripped file. Then I dragged all the VOB files into the sequence in the proper order, and got ready for noise-filtering.
I also knew that I was going to filter the file using the Neat Video filter. Unlike most noise filters, the Neat Video filter uses sophisticated algorithms to discern and remove only true noise, with very little blurriness or distortion.
Though the filter boosted rendering time by 6X, it reduced visible noise in all encoded files with some reduction in blockiness. You can see this in Figure 8, which I've treated to highlight the blockiness in the background. On the left is the filtered version, on the right, the unfiltered, and the blockiness is most apparent over the speaker's right shoulder. The difference is even more noticeable during real time playback, where the filtered footage is clearly noiser.

Finally, I knew that I was going to output in Apple ProRes 422 to create a file that I could input into my encoding tool. Though ProRes isn't totally lossless, it's a fast and efficient format that's always worked well for me in the past.
With all these decisions made, it was time to choose an encoding tool that provided the necessary deinterlacing quality to meet our goals. Fortunately, it was a short search.
Choosing an Encoding Tool
Over the years, Sorenson Squeeze has done a great job with H.264 quality, and deinterlacing quality has been top notch all the way back to version 5.0. So, I tried Squeeze first.

Squeeze offers multiple deinterlacing options, as shown in Figure 9, with Auto Adaptive Discard Field the default. Unfortunately, because this method throws a field away, it makes for huge jaggies with highly detailed content like that shown on the left in Figure 10. So I tried Adaptive Blend, which produced the output shown on the right. This was the best result I had seen up to that point, and was the one we ultimately used in production.

I should say that Auto Adaptive Discard Field does a slightly better job with real world footage, and if you look closely enough at the final encoded footage produced for SunCam, some frames show some slight jaggies that wouldn't be present had I used Auto Adaptive Discard Field. But clearly Adaptive Blend produced the best result with the key sequences at the start of the test video.
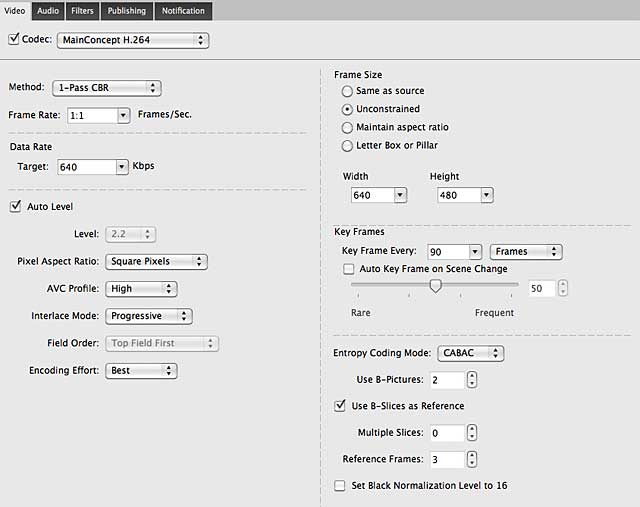
As mentioned previously, when encoding for adaptive streaming, you should use constant bit rate encoding, choose the same key frame interval for all files with scene change detection disabled and to encode all files using identical audio parameters. Otherwise, the H.264 encoding parameters are similar to what you would would use for single file encoding. Figure 11 shows the encoding parameters that I used for the 700 kbps file; other encodes were identical except for the video data rate.

So, back at the ranch, I deleted the fast zoom-out from the test sequence and reencoded the rest using this workflow and encoding parameters, including a file at 400 kbps just for kicks. Then, I uploaded the files to a Dropbox account for the client to play and crossed my fingers.
Within an hour, I got the following response. "Excellent! Even the 400kbps file looks better now, and the 1 Mbps file looks great. Let's use your new slate of bit rates and proceed. Nice work!"
Whew, the project was on. Now I just had to figure out how to most efficiently produce and quality control the encoded files.
Jan Ozer's article first appeared on OnlineVideo.net
Companies and Suppliers Mentioned